Scaffolding a new agent
How to use Scaffolds to bootstrap your Highlighter agents
Setup
If you haven't already, you should checkout Getting Started With Highlighter SDK
Create simple Agent
hl generate agent .. This will:
- create an
agents/dir with an agent definition and a data source Capability for the data type specified in the prompts - create a
src/<title_slug>/<capability_name>.pywith a dummy implementation - add a
## Run Agentsection to yourREADME.md
- Run the command in the
## Run Agentsection of theREADME.md
Create a new Capability and add it to the Agent
- Download some weights from Huggingface, https://huggingface.co/SpotLab/YOLOv8Detection/blob/3005c6751fb19cdeb6b10c066185908faf66a097/yolov8n.onnx
- Make a
weightsdirectory and move them toweights/yolov8n.onnx - Create a new file in
src/???/capabilities/detector_capability.py - Follow the instructions in the below code snippet
# Update your imports
from uuid import UUID
from highlighter.agent.capabilities.image_to_enum import OnnxYoloV8
# Add "MyPersonDetector" to the __all__, it should now have "MyPersonDetector"
# and the name of your original Capability that was generated by the
# `hl generate agent` script
# Add this class to the end of the file
# This class extends the base OnnxYoloV8 Capability by adding some default
# parameters and a log statement, you can do whatever you want later.
class MyPersonDetector(OnnxYoloV8):
    class DefaultStreamParameters(OnnxYoloV8.DefaultStreamParameters):
        num_classes: int = 1
        class_lookup: Optional[Dict[int, Tuple[UUID, str]]] = {0: (UUID(int=0), "person")}
        #conf_thresh: float = 0.1
        #nms_iou_thresh: float = 0.5
        is_absolute: bool = False
    def process_frame(self, stream, data_files: List[DataFile]) -> Tuple[StreamEvent, Dict]:
        stream_event, result = super().process_frame(stream, data_files)
        self.logger.info(f"processed: {data_files[0].media_frame_index} with {len(result['annotations'][0])} annotations")
        return stream_event, result
- Modify your agent definition
# Update the "graph" value
"graph": ["(Source MyPersonDetector ImageOverlay ImageWrite)"],
# Add this to your "elements" list
   {
      "name": "MyPersonDetector",
      "parameters": {
          "onnx_file": "weights/yolov8n.onnx"
      },
      "input": [
        {
          "name": "data_files",
          "type": "List[DataFile]"
        }
      ],
      "output": [
        {
          "name": "annotations",
          "type": "List[Annotation]"
        }
      ],
      "deploy": {
        "local": {
          "module": "my_awesome_project.capabilities"
        }
      }
    },
    {
      "name": "ImageOverlay",
      "parameters": {
      },
      "input": [
        {
          "name": "data_files",
          "type": "List[DataFile]"
        },
        {
          "name": "annotations",
          "type": "List[Annotation]"
        }
      ],
      "output": [
        {
          "name": "data_files",
          "type": "List[DataFile]"
        }
      ],
      "deploy": {
        "local": {
          "module": "highlighter.agent.capabilities.image_transforms"
        }
      }
    },
    {
      "name": "ImageWrite",
      "parameters": {
          "output_dir": "image_overlays",
          "output_pattern": "{media_frame_index}.jpg"
      },
      "input": [
        {
          "name": "data_files",
          "type": "List[DataFile]"
        }
      ],
      "output": [
      ],
      "deploy": {
        "local": {
          "module": "highlighter.agent.capabilities"
        }
      }
    }
Run Detector Agent
Run all scripts from the top level of the repo
Note: on Windows replace / with \
- Create a directory called
image_overlays
# process one file
hl agent run agents/YOU_AGENT_DEF.json -f VIDEO_PATH
Training
Training a model using the Highlighter SDK
Concepts
- Highlighter Training Run: A record in the Highlighter tool used to configure a training run.
- Evaluation: A page in the Highlighter tool used to record and track the performance of trained models.
- Artefact: A file containing model weights and accompanying information needed to run a model for inference.(Enables saving and tracking of trained models and results in Highlighter, ensuring others can access and reuse them without retraining.)
- Highlighter SDK: A python library including a CLI for interacting with Highlighter and doing common Highlighter related things, like training models.
To train a model using the SDK you must first setup the training run in the Highlighter Account. Then you can start the training run on the development machine using the Highlighter SDK
Create New Training Run In Highlighter
-
Navigate to the Training tab in Highlighter
-
Click Train a new model or select an existing training run (we're going to assume you're training a new model)
-
Fill in the Name field with a meaningful name for your training run
-
Select the Capability the what the training run is for.
-
Select the Evaluation that will store the training run's evaluation metrics.
-
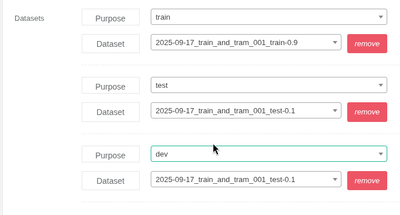
Select Datasets
A training run must have at least one dataset for training and another of testing. There can be no overlay between the training and test annotations.
- Model Template can be ignored, leave as default.
- Config Override can be ignored, leave as default.
- Click Save Training Run.
- Note the Training Run Id from the URL, (ie: https://highlighter-marketing-demo.highlighter.ai/training_runs/123).The training run id is 123
Start Model Training Using The Highlighter SDK
hl generate training-run TRAINING_RUN_ID {yolo-det|yolo-seg|yolo-cls} ML_TRAINING_DIRGenerates a local training directory for a specified Highlighter training run. Downloads the configuration files, datasets, and model weights (for detection, segmentation, or classification) into the provided directory, allowing you to reproduce, resume, or evaluate the training locally.
hl generate training-run 123 yolo-seg .
Where 123 is the Training Run ID, yolo-seg is the type of model to train, and . (dot) tells the sdk to create the directory (./123) in the current working directory that will store the training files.
- OPTIONAL: Edit the
cfg.yamlusing your favourite text editor: eg:vim 123/cfg.yaml. - OPTIONAL: Override the default
Trainerclass: You may need to override to defaultTrainerclass if you need to:
- Customize the Highlighter Dataset pre-processing to filter out annotations before saving the dataset.
- Customize the cropping that occurs prior to saving a classification dataset
- Train the model on a attribute that is not an OBJECT CLASS
Below is commented example of a custom
Trainerclass that does all 3 of the above.
To create your own you must create a trainer.py in your training run's directory.
"""
Import the implementation of the Trainer class you wish to override
"""
from highlighter.trainers.yolov11 import YoloV11Trainer
from highlighter.datasets.cropping import CropArgs
import uuid

"""Inherate from the base implementation
"""
class Trainer(YoloV11Trainer):

    crop_args: CropArgs = CropArgs(
            # If true, expect to crop non orthogonal rectangles.
            # Once extracted the crops will be transformed to be an orthogonal
            # rectangle of the same size. Use warped_wh to transform the
            # rotated rectangles to a different shape
            crop_rotated_rect=False,

            # Optional[Tuple[int, int]]
            warped_wh=None,

            # Optional[float]: proportionally scale the rectangle before cropping
            scale=1.0,

            # Optional[int]: pad the rectangle before cropping
            pad=0,
            )

    # Only use attributes with this specific attribute_id as the
    # categories for your dataset
    category_attribute_id: UUID = uuid.UUID(CUSTOM_ATTRIBUTE_UUID)

    # Optionally define a list of attribute values to use for your dataset.
    # If None, then use the output attributes defined in the TrainingConfigType.input_output_schema.
    # If categories is set then the YoloWrite will respect the order they are
    # listed.
    categories: Optional[List[str]] = None

    def filter_dataset(self, dataset: Dataset) -> Dataset:
        """Optionally add some code to filter the Highlighter Datasets as required.
        The YoloWriter will only use entities with both a pixel_location attribute
        and a 'category_attribute_id' attribute when converting to the Yolo dataset format.
        It will the unique values for the object_class attribute as the detection
        categories.

        For example, if you want to train a detector that finds Apples and Bananas,
        and your taxonomy looks like this:

            - object_class: Apple
            - object_class: Orange
            - object_class: Banana

        Then you may do something like this:

            adf = combined_ds.annotations_df
            ddf = combined_ds.data_files_df

            orange_entity_ids = adf[(adf.attribute_id == OBJECT_CLASS_ATTRIBUTE_UUID) &
                                   (adf.value == "Orange")].entity_id.unique()

            # Filter out offending entities
            adf = adf[adf.entity_id.isin(orange_entity_ids)]

            # clean up images that are no longer needed
            ddf = ddf[ddf.data_file_id.isin(adf.data_file_id)]

            combined_ds.annotations_df = adf
        """
        return dataset
- Start training hl train start TRAINING_RUN_DIR , eg
hl train start 123/. - OPTIONAL: Run evaluation hl train evaluate TRAINING_RUN_DIR CHECKPOINT CONFIG , use the
--createflag to upload the evaluation metrics to the Highlighter Evaluation linked to the Training Run. - OPTIONAL: Export the trained model and upload as a Highlighter Training Run Artefact.Eg:
hl training-run artefact create -i 123 -a 123/runs/weights/artefact.yaml.